Ports Configuration
Use the Ports configuration page to configure the communication ports on the receiver. The Ports configuration page is also used to configure the logs that are output from a specific communications port.
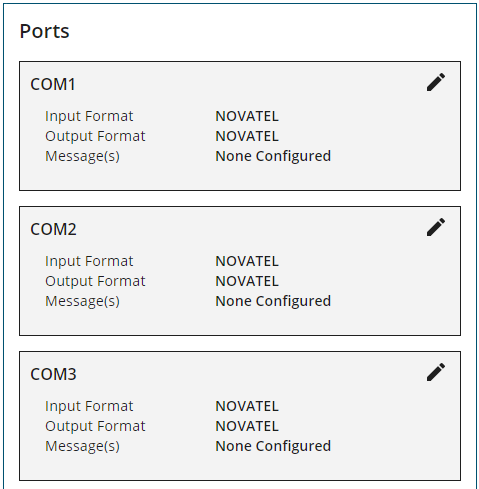
Click the Ports bar to open the Ports configuration window. The communication ports that have been configured (changed from default values) are listed on the Ports page.
If the communication port to be configured is not listed on the Ports page, click Add Port or Add Another Port.
To configure a port, click the Edit icon beside the port.
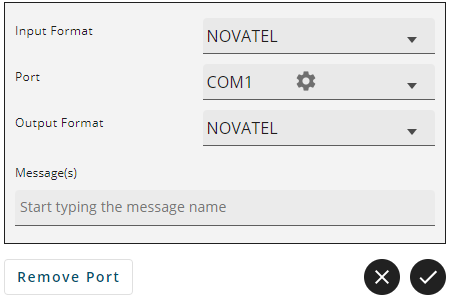
Input Format
The input format sets the type of message the port will accept. To set the input format, click the Input Format drop menu and select the format to use.
Auto
Set the port to automatically detect the format of the incoming RTK corrections.
CMR
Set the port to accept RTK correction messages in CMR format.
None
Disable input on the port.
NOVATEL
Set the port to accept NovAtel commands
NOVATELX
Set the port to accept RTK correction messages in NOVATELX format.
RTCA
Set the port to accept RTK correction messages in RTCA format.
RTCM
Set the port to accept RTK correction messages in RTCM format.
RTCMV3
Set the port to accept RTK correction messages in RTCM Version 3.0 format.
VERIPOS
Set the port to accept PPP correction messages over IP.
Port
There are several types of communication port that can be configured.
COM Port
A COM port is a serial communication port. The number of COM ports available varies depending on the type of receiver. To configure a COM port:
-
Click the Port drop menu and select the COM port to configure.
-
Click the settings icon (
 ) and set the communication parameters to match the device connected to the port
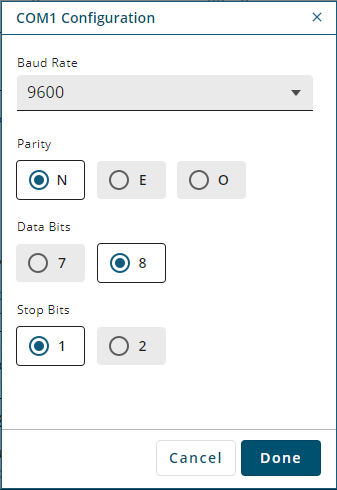
-
Click the Baud Rate drop menu and select the communication rate (bps) used by this serial port. The default baud rate is 9600.
-
Click N, E or O to select the parity used by this serial port.
N = No parity, E = Even parity, O = Odd parity. The default parity is N (No Parity).
-
Click 7 or 8 to select the number of data bits used for each data message transmitted. The default is 8 data bits.
-
Click 1 or 2 to select the number of stop bits used for each data message transmitted. The default is 1 stop bit.
-
Click the Done button to save the changes and close the COM Configuration window.
ICOM Port
ICOM ports are virtual ports used for Ethernet or Wi-Fi connections. To configure an ICOM port:
-
Click the Port drop menu and select the ICOM port.
-
Click the settings icon (
) and set the communication parameters used for the ICOM port. 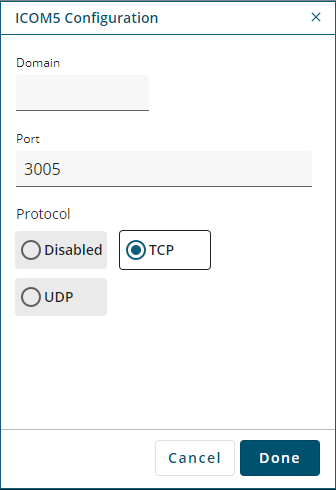
-
In the Domain box, enter the hostname or IP address of the device.
-
In Port box, enter the TCP/UDP port number used by this ICOM port.
-
Click one of the following buttons to select the protocol used by this ICOM port.
-
Disabled – Disable this ICOM port.
-
TCP – Use raw TCP on this port.
-
UDP – Use raw UDP on this port.
-
-
Click the Done button to save the changes and close the ICOM Configuration window.
NCOM
Network ports are used when the receiver is acting as an NTRIP server. The receiver must have an Ethernet connection to use NCOM ports.
To configure a NCOM port:
-
Click the Port drop menu and select the NCOM port.
-
Click the settings icon (
) and set the communication parameters used for the NCOM port. 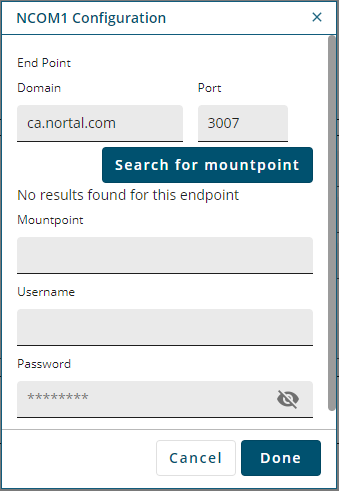
-
In the Domain box, enter the hostname or IP address of the Endpoint.
-
In Port box, enter the TCP/UDP port number of the Endpoint.
-
Click the Search for Mountpoint button.
-
Click the Mountpoint drop menu and click on the mountpoint to use.
-
Click the Username box and enter the login user name. The username can be up to 30 characters long.
-
Click the Password box and enter the login password. The Password can be up to 30 characters long.
-
Click the Done button to save the changes and close the NCOM Configuration window.
USB
A USB port is used to communicate with a device using a USB cable. To add a USB port, click the Port drop menu and select one of the USB ports.
Output Format
The output format sets the type of message the port will send. To set the output format, click the Output Format drop menu and select the format to use.
CMR
Set the receiver to send RTK correction messages in CMR format.
NMEA
Sets the port to use NovAtel format and makes NMEA logs available in the Messages box.
NONE
Disable output on the port.
NOVATEL
Set the port to send NovAtel logs.
NOVATELX
Set the receiver to send RTK correction messages in NOVATELX format.
RTCA
Set the receiver to send RTK correction messages in RTCA format.
RTCM
Set the receiver to send RTK correction messages in RTCM format.
RTCMV3
Set the receiver to send RTK correction messages in RTCM Version 3.0 format.
Messages
The Messages box shows the logs being sent out of this port.
To add a log:
-
Click the Messages box and start typing the name of the log to add.
A list of logs that start with the letters typed appears.
-
Click the name of the log to add.
Message Settings
To edit the collection parameters of the log:
-
Click the settings icon.
The Message Settings dialog box appears. -
Adjust the setting for the log.
To change the logging settings for a log, select the parameter from the drop menus for the log.
Format
Click ASCII, Binary or Abbr ASCII to select the format in which this log is generated.
Trigger
The trigger determines when the log is generated.
-
ONTIME
Outputs the log at a regular interval. The number of seconds between log generation is set in the Period option.
-
ONCHANGED
Outputs the current message and then continues to output when the message is changed.
-
ONCE
Outputs the current message. If no message is currently present, the next message is output when available.
-
ONNEW
Does not output the current message, but outputs when the message is updated (not necessarily changed).
-
ONALL
Outputs the current message and then continues to output when the message is updated (not necessarily changed).
The ONALL trigger is available on firmware versions 7.09.01 and higher.
The triggers available depend on the log type.
Log Type Triggers Type
Recommended Trigger
Illegal Triggers
Synch
ONTIME
ONNEW, ONCHANGED
Asych
ONCHANGED or ONCE
–
Polled
ONCE or ONTIME
ONNEW, ONCHANGED
Period
The log period in seconds (for ONTIME trigger).
Valid values for the high rate logging are 0.01, 0.02, 0.05, 0.1, 0.2, 0.25 and 0.5. For logging slower than once per second, any integer value is accepted.
If the value entered is lower than the minimum measurement period, the value will be rejected.
-
-
Repeat these steps to adjust the message settings for each log being collected.
-
Click Apply to save the changes for all of the logs.
Message Settings NMEA Logs
To edit the collection parameters of a NMEA log:
-
Click the settings icon.
The Message Settings dialog box appears. -
Select the NMEA Log Prefix option for this log.
-
GP
The NMEA log will have a prefix of GP and the NMEA log will only include information about the GPS satellites, even when the receiver is tracking multiple constellations.
-
Auto
The NMEA log prefix changes as per the constellations enabled on the receiver. When there is one constellation in the solution and SPAN is disabled, the NMEA Talker ID is output as: GP for GPS, GL for GLONASS, GA for Galileo, and GB/BD for BeiDou. If more than one constellation is in the solution, the prefix is GN with the exception of GPGSV.
-
-
If Auto was selected as the NMEA Log Prefix, select the BeiDou Log Prefix.
-
Select GB to use the current NMEA ID for BeiDou.
-
Select BD to use the legacy NMEA ID for BeiDou.
-
-
Click one of the Precision buttons to select the number of decimal places used for the latitude and longitude values in this log.
The Precision setting is only supported for NMEA logs such as GPGGA and GPGGALONG.
-
Click one of the Quality Indicator buttons to select the quality indicator that will be used for this log.
The Quality indicator setting is only supported for NMEA logs such as GPGGA and GPGGALONG.
-
Click the Trigger drop menu and select the trigger used for the log.
-
Enter the log Period in seconds.
Valid values for the high rate logging are 0.01, 0.02, 0.05, 0.1, 0.2, 0.25 and 0.5. For logging slower than once per second, any integer value is accepted. If the value entered is lower than the minimum measurement period, the value will be rejected.
-
Set the Trigger and Period for each NMEA log.
-
Click the Apply button to save the changes for all of the logs.
To remove a log from this port, click the X icon on the button for the log.
Click Apply to save the configuration on the receiver.