Output side – Main window
The Output side of the Main window defines how the converted log output file is managed.
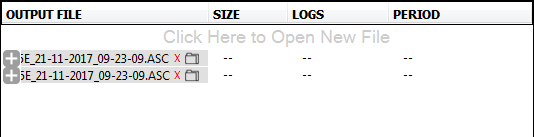
For each file added on the Input side, an output file is added on the Output side.
To change the name of the output file, select the file name and enter the new name.
To change the directory in which the output file will be stored:
-
Click the folder icon. A Save As dialog box appears.
-
Navigate to the directory in which the converted output file will be stored.
-
If a different file name is required, enter the new name in the File name text box.
-
Click the Save button.
To view the settings available for the output file, click the + button.
The settings available depend on the output format selected (ASCII, BINARY, RINEX or KML).
ASCII, BINARY and KML output
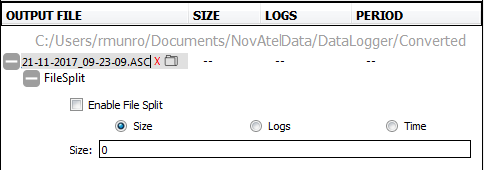
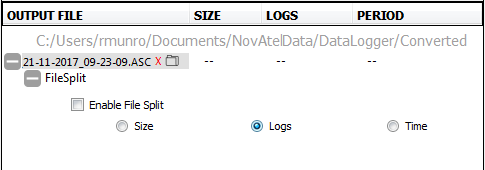
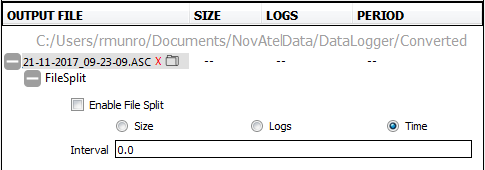
The size of a log file converted to ASCII, binary or KML can be managed by splitting the output file based on file size, log type or time interval.
Split by file size
-
Click the + button beside the output file name.
-
Click the + button beside FileSplit.
-
Select the Enable File Split checkbox.
-
Click the Size radio button.
-
Enter the maximum file size of the converted output file (in MBs).
If the maximum size is reached, Convert will create multiple output files when converting the log file.
A suffix ("_Part1", "_Part2", etc.) is added to the name of the output files to indicate the order of the files.
Split by log type
-
Click the + button beside the output file name.
-
Click the + button beside FileSplit.
-
Select the Enable File Split checkbox.
-
Click the Logs radio button.
Convert will create a separate file for each log type converted. Each output file is appended with the name of the log.
Split by time interval
-
Click the + button beside the output file name.
-
Click the + button beside FileSplit.
-
Select the Enable File Split checkbox.
-
Click the Time radio button.
-
Enter the maximum time length (in hours) of the converted output file in the Interval text box.
If the length of the file exceeds the time entered, Convert will create multiple output files when converting the log file. A suffix ("_Part1", "_Part2", etc.) is added to the name of the output files to indicate the order of the files.
RINEX output
If the conversion type is one of the RINEX formats, the Output side shows Constellation and Files settings in place of File Split.
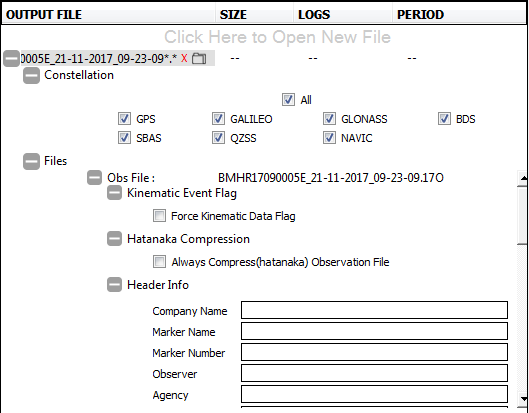
To include the RINEX navigation files for the constellations:
-
Click the + button beside the output file name.
-
Click the + button beside Constellation.
-
Select or clear the checkboxes beside the constellation names to choose which navigation files will be included with the output file. If a checkbox is selected (has a check mark), the navigation file for that constellation will be included with the output file. If a checkbox is cleared, the navigation file for that constellation will not be included.
To change the settings for the RINEX Obs file:
-
Click the + button beside the output file name.
-
Click the + button beside Files
-
Click the + button beside Obs File.
-
To configure Convert to create the resulting RINEX output files as kinematic when converting from other formats, click the + button beside Kinematic Event Flag and select the Force Kinematic Data Flag checkbox.
-
To enable Hatanaka compression of the Obs file, click the + button beside Hatanaka Compression and select the Always Compress(hatanaka) Observation File checkbox.
-
To add comments to the Obs file header, click the + button beside Header Info and enter the information in the text boxes.